前言
示例代码已经上传到github:点击跳转 点击跳转 点击跳转 gRPC with REST and Open APIs 。
一、gRPC-Gateway概述 1、简述
取自官方概述:
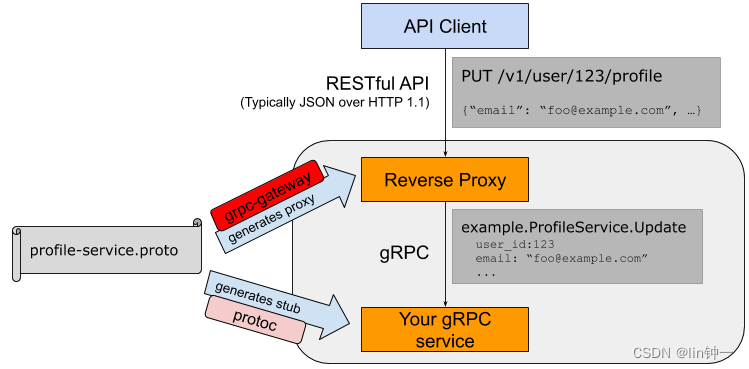
gRPC-Gateway 是 protoc 的插件。它读取gRPC服务定义并生成反向代理服务器,将 RESTful JSON API 转换为 gRPC。该服务器是根据服务定义中的 google.api.http 注释生成的。
2、出现 etcd v3 改用 gRPC 后为了兼容原来的 API,同时要提供 HTTP/JSON 方式的API,为了满足这个需求,要么开发两套 API,要么实现一种转换机制,所以grpc-gateway诞生了。
通过protobuf的自定义option实现了一个网关,服务端同时开启gRPC和HTTP服务。
HTTP服务接收客户端请求后转换为grpc请求数据,获取响应后转为json数据返回给客户端。
当 HTTP 请求到达 gRPC-Gateway 时,它将 JSON 数据解析为 Protobuf 消息。使用解析的 Protobuf 消息发出正常的 Go gRPC 客户端请求。
Go gRPC 客户端将 Protobuf 结构编码为 Protobuf 二进制格式,然后将其发送到 gRPC 服务器。
gRPC 服务器处理请求并以 Protobuf 二进制格式返回响应。
Go gRPC 客户端将其解析为 Protobuf 消息,并将其返回到 gRPC-Gateway,后者将 Protobuf 消息编码为 JSON 并将其返回给原始客户端。
架构如下
二、准备工作 由于本实践偏向 Grpc+Grpc Gateway的方面,我们的需求是同一个服务端支持Rpc和Restful Api,那么就意味着http2、TLS等等的应用,功能方面就是一个服务端能够接受来自grpc和Restful Api的请求并响应。
本文示例代码已经上传到github:点击跳转
1、目录结构 新建grpc-gateway-example文件夹,我们项目的初始目录目录如下:
1
2
3
4
5
6
7
8
9
10
11
12
13
14
grpc-gateway-example/ ├── certs ├── client ├── cmd ├── pkg ├── proto │ ├── google │ │ └── api │ │ │ └── annotations.proto │ │ │ └── http.proto │ │ └── protobuf │ │ │ └── descriptor.proto ├── server └── Makefile
certs:存放证书凭证
client:客户端
cmd:存放 cobra 命令模块
pkg:第三方公共模块
proto:protobuf的一些相关文件(含.proto、pb.go、.pb.gw.go),google/api中用于存放annotations.proto、http.proto、google/protobuf中用于存放descriptor.proto
server:服务端
Makefile:用于存放编译的代码。
2、环境准备 1)Protobuf 详细的请移步到《gRPC(二)入门:Protobuf入门》
2)gRPC 详细的请移步到《gRPC(三)基础:gRPC快速入门》
3)gRPC-Gateway gRPC-Gateway 只是一个插件,只需要安装一下就可以了。这里建议科学上网:
1 go get -u github.com/grpc-ecosystem/grpc-gateway/protoc-gen-grpc-gateway
3、编写 IDL 1)google.api proto 目录中有 google/api 目录,它用到了 google 官方提供的两个 api 描述文件,主要是针对 grpc-gateway 的 http 转换提供支持,定义了 Protocol Buffer 所扩展的 HTTP Option。
2)hello.proto 编写Demo的 .proto 文件,我们在 proto目录下新建 hello.proto 文件,写入文件内容:
1
2
3
4
5
6
7
8
9
10
11
12
13
14
15
16
17
18
19
20
21
22
23
24
25
26
27
28
syntax = "proto3" ; package proto;option go_package = "./proto/helloworld;helloworld" ; import "proto/google/api/annotations.proto" ;service Hello { rpc SayHello(HelloRequest) returns (HelloResponse) { option (google.api.http) = { post: "/hello_world" body: "*" }; } } message HelloRequest { string referer = 1 ; } message HelloResponse { string message = 1 ; }
在 hello.proto 文件中,引用了 google/api/annotations.proto ,达到支持HTTP Option的效果
定义了一个 serviceRPC 服务 HelloWorld,在其内部定义了一个 HTTP Option 的POST方法,HTTP 响应路径为/hello_world。
定义message类型HelloWorldRequest、HelloWorldResponse,用于响应请求和返回结果。
每个方法都必须添加 google.api.http 注解后 gRPC-Gateway 才能生成对应 http 方法。/hello_world 则是请求路径。
3)编译proto 在Makefile文件内输入以下内容:
1
2
protoc: protoc --go_out=. --go -grpc_out=. --grpc-gateway_out=. ./proto
Go Plugins 用于生成 .pb.go 文件
gRPC Plugins 用于生成 _grpc.pb.go
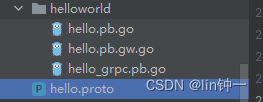
gRPC-Gateway 则是 pb.gw.go
使用 make protoc 编译proto:
1
2
➜ make protoc protoc --go_out=. --go -grpc_out=. --grpc-gateway_out=. ./proto
4、制作证书 详细的请移步到《gRPC(五)进阶:通过TLS建立安全连接》
在服务端支持Rpc和Restful Api,需要用到TLS,因此我们要先制作证书
进入certs目录,生成TLS所需的公钥密钥文件
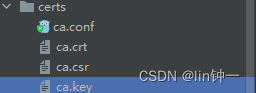
1)生成CA根证书 在 ca.conf 文件并写入内容如下:
1
2
3
4
5
6
7
8
9
10
11
12
13
14
15
16
[ req ] default_bits = 4096 distinguished_name = req_distinguished_name [ req_distinguished_name ] countryName = GB countryName_default = CN stateOrProvinceName = State or Province Name (full name) stateOrProvinceName_default = ZheJiang localityName = Locality Name (eg, city) localityName_default = HuZhou organizationName = Organization Name (eg, company) organizationName_default = Step commonName = linzyblog.netlify.app commonName_max = 64 commonName_default = linzyblog.netlify.app
生成ca私钥,得到ca.key
1 openssl genrsa -out ca.key 4096
生成ca证书签发请求,得到ca.csr
1
2
3
4
5
6
$ openssl req -new -sha256 -out ca.csr -key ca.key -config ca.conf GB [CN]: State or Province Name (full name) [ZheJiang]: Locality Name (eg, city) [HuZhou]: Organization Name (eg, company) [Step]: linzyblog.netlify.app [linzyblog.netlify.app]:
生成ca根证书,得到ca.crt
1 openssl x509 -req -days 3650 -in ca.csr -signkey ca.key -out ca.crt
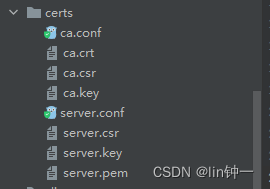
2)生成终端用户证书 在 server.conf 写入以下内容:
1
2
3
4
5
6
7
8
9
10
11
12
13
14
15
16
17
18
19
20
21
22
23
[ req ] default_bits = 2048 distinguished_name = req_distinguished_name [ req_distinguished_name ] countryName = Country Name (2 letter code) countryName_default = CN stateOrProvinceName = State or Province Name (full name) stateOrProvinceName_default = ZheJiang localityName = Locality Name (eg, city) localityName_default = HuZhou organizationName = Organization Name (eg, company) organizationName_default = Step commonName = CommonName (e.g. server FQDN or YOUR name) commonName_max = 64 commonName_default = linzyblog.netlify.app [ req_ext ] subjectAltName = @alt_names [alt_names] DNS.1 = grpc-gateway-example IP = 127.0 .0 .1
生成私钥,得到server.key
1 openssl genrsa -out server.key 2048
生成证书签发请求,得到server.csr
1 openssl req -new -sha256 -out server.csr -key server.key -config server.conf
这里也一直回车就好。
用CA证书生成终端用户证书,得到server.crt
1 openssl x509 -req -days 3650 -CA ca.crt -CAkey ca.key -CAcreateserial -in server.csr -out server.pem -extensions req_ext -extfile server.conf
这样我们需要的证书凭证就足够了
三、命令行模块 cmd 1、Cobra介绍 官方文档:点击跳转
Cobra 是一个用于创建强大的现代 CLI 应用程序的库。它提供了一个简单的界面来创建强大的现代 CLI 界面,类似于 git 和 go 工具。
Cobra 提供:
简易的子命令行模式
完全兼容 POSIX 的命令行模式(包括短版和长版)
嵌套的子命令
全局、本地和级联flags
使用Cobra很容易的生成应用程序和命令,使用 cobra create appname和 cobra add cmdname
提供智能提示
自动生成commands和flags的帮助信息
自动生成详细的 help 信息,如 app -help。
自动识别帮助 flag、 -h,--help。
自动生成应用程序在 bash 下命令自动完成功能。
自动生成应用程序的 man 手册。
命令行别名。
自定义 help 和 usage 信息。
可选的与 viper 的紧密集成。
2、概念 Cobra 建立在命令(commands)、参数(arguments )、选项(flags)的结构之上。
commands :命令代表行为,一般表示 action,即运行的二进制命令服务。同时可以拥有子命令(children commands)arguments :参数代表命令行参数。flags :选项代表对命令行为的改变,即命令行选项。二进制命令的配置参数,可对应配置文件。参数可分为全局参数和子命令参数。
最好的命令行程序在实际使用时,就应该像在读一段优美的语句,能够更加直观的知道如何与用户进行交互。
执行命令行程序应该遵循一般的格式:
1 2 3 4 5 6 7 8 docker pull alpine:latest docker ps -a git commit -m "linzy"
3、安装 使用 Cobra 很容易。首先,用于go get安装最新版本的库。
1 go get -u github.com/spf13/cobra@latest
4、编写 server 在编写 cmd 时需要先用 server 进行测试关联,因此这一步我们先写 server.go 用于测试
在 server 模块下 新建 server.go 文件,写入测试内容:
1
2
3
4
5
6
7
8
9
10
11
12
13
14
15
16
17
18
19
20
21
22
23
24
package serverimport ( "log" ) var ( ServerPort string CertName string CertPemPath string CertKeyPath string ) func Serve () error ) { log.Println(ServerPort) log.Println(CertName) log.Println(CertPemPath) log.Println(CertKeyPath) return nil }
5、编写 cmd 在cmd模块下 新建 root.go 文件,写入内容:
1
2
3
4
5
6
7
8
9
10
11
12
13
14
15
16
17
18
19
20
21
22
23
24
package cmdimport ( "fmt" "os" "github.com/spf13/cobra" ) var rootCmd = &cobra.Command{ Use: "grpc" , Short: "Run the gRPC hello-world server" , } func Execute () if err := rootCmd.Execute(); err != nil { fmt.Println(err) os.Exit(-1 ) } }
当前 cmd 目录下继续 新建 server.go 文件,写入内容:
1
2
3
4
5
6
7
8
9
10
11
12
13
14
15
16
17
18
19
20
21
22
23
24
25
26
27
28
29
30
31
32
33
34
35
36
37
38
package cmdimport ( "github.com/spf13/cobra" "grpc-gateway-example/server" "log" ) var serverCmd = &cobra.Command{ Use: "server" , Short: "Run the gRPC hello-world server" , Run: func (cmd *cobra.Command, args []string ) defer func () if err := recover (); err != nil { log.Println("Recover error : %v" , err) } }() server.Serve() }, } func init () serverCmd.Flags().StringVarP(&server.ServerPort, "port" , "p" , "50052" , "server port" ) serverCmd.Flags().StringVarP(&server.CertPemPath, "cert-pem" , "" , "./certs/server.pem" , "cert pem path" ) serverCmd.Flags().StringVarP(&server.CertKeyPath, "cert-key" , "" , "./certs/server.key" , "cert key path" ) serverCmd.Flags().StringVarP(&server.CertName, "cert-name" , "" , "grpc-gateway-example" , "server's hostname" ) rootCmd.AddCommand(serverCmd) }
6、启动 & 请求 我们在 grpc-gateway-example 目录下,新建文件main.go,写入内容:
1
2
3
4
5
6
7
package mainimport "grpc-gateway-example/cmd" func main () cmd.Execute() }
当前目录下执行·go run main.go server·,查看输出是否为(此时应为默认值):
1
2
3
4
5
$ go run main.go server 2022 /11 /10 12 :08 :22 50052 2022 /11 /10 12 :08 :22 grpc-gateway-example 2022 /11 /10 12 :08 :22 ./certs/server.pem 2022 /11 /10 12 :08 :22 ./certs/server.key
执行go run main.go server --port=8000 --cert-pem=test-pem --cert-key=test-key --cert-name=test-name,检验命令行参数是否正确:
1
2
3
4
5
$ go run main.go server --port=8000 --cert-pem=test-pem --cert-key=test-key --cert-name=test-name 2022 /11 /10 12 :24 :53 8000 2022 /11 /10 12 :24 :54 test-name2022 /11 /10 12 :24 :54 test-pem 2022 /11 /10 12 :24 :54 test-key
到这都无误,我们的 cmd 模块编写就正确了,下面开始我们的重点
7、目录结构 完成以上操作之后我们的目录是这样的结构,看看是不是缺少了:
1
2
3
4
5
6
7
8
9
10
11
12
13
14
15
16
17
18
19
20
21
22
grpc-gateway-example/ ├── certs ├── client ├── cmd │ ├── root.go │ └── server.go ├── pkg ├── proto │ ├── google │ │ └── api │ │ │ ├── annotations.proto │ │ │ └── http.proto │ │ └── protobuf │ │ │ └── descriptor.proto │ ├── helloworld │ │ ├── hello.pb.go │ │ ├── hello.pb.gw.go │ │ └── hello_grpc.pb.go │ ├── hello.proto ├── server │ └── server.go └── Makefile
四、服务端模块 server 1、编写 hello.proto 在server目录下新建文件 hello.go ,写入文件内容:
1
2
3
4
5
6
7
8
9
10
11
12
13
14
15
16
17
18
19
20
21
22
package serverimport ( "context" "grpc-gateway-example/proto/helloworld" ) type helloService struct { helloworld.UnimplementedHelloServer } func NewHelloService () return &helloService{} } func (h helloService) error ) { return &helloworld.HelloResponse{ Message: "hello grpc-gateway" , }, nil }
2、编写 grpc.go 在 pkg 下新建 util 目录,新建 grpc.go 文件,写入内容:
1
2
3
4
5
6
7
8
9
10
11
12
13
14
15
16
17
18
19
20
21
22
23
package utilimport ( "google.golang.org/grpc" "net/http" "strings" ) func GrpcHandlerFunc (grpcServer *grpc.Server, otherHandler http.Handler) if otherHandler == nil { return http.HandlerFunc(func (w http.ResponseWriter, r *http.Request) grpcServer.ServeHTTP(w, r) }) } return http.HandlerFunc(func (w http.ResponseWriter, r *http.Request) if r.ProtoMajor == 2 && strings.Contains(r.Header.Get("Content-Type" ), "application/grpc" ) { grpcServer.ServeHTTP(w, r) } else { otherHandler.ServeHTTP(w, r) } }) }
GrpcHandlerFunc 函数是用于判断请求是来源于 Rpc 客户端还是 Restful Api 的请求,根据不同的请求注册不同的 ServeHTTP 服务;r.ProtoMajor == 2 也代表着请求必须基于HTTP/2。
如果不需要 TLS 建立安全链接,则可以使用h2c:
1
2
3
4
5
6
7
8
9
func GrpcHandlerFunc (grpcServer *grpc.Server, otherHandler http.Handler) return h2c.NewHandler(http.HandlerFunc(func (w http.ResponseWriter, r *http.Request) if r.ProtoMajor == 2 && strings.Contains(r.Header.Get("Content-Type" ), "application/grpc" ) { grpcServer.ServeHTTP(w, r) } else { otherHandler.ServeHTTP(w, r) } }), &http2.Server{}) }
3、编写 tls.go 在pkg下的 util 目录下,新建 tls.go 文件,写入内容:
1
2
3
4
5
6
7
8
9
10
11
12
13
14
15
16
17
18
19
20
21
22
23
24
25
26
27
28
29
30
31
package utilimport ( "crypto/tls" "golang.org/x/net/http2" "io/ioutil" "log" ) func GetTLSConfig (certPemPath, certKeyPath string ) var certKeyPair *tls.Certificate cert, _ := ioutil.ReadFile(certPemPath) key, _ := ioutil.ReadFile(certKeyPath) pair, err := tls.X509KeyPair(cert, key) if err != nil { log.Println("TLS KeyPair err: %v\n" , err) } certKeyPair = &pair return &tls.Config{ Certificates: []tls.Certificate{*certKeyPair}, NextProtos: []string {http2.NextProtoTLS}, } }
GetTLSConfig 函数是用于获取TLS配置,在内部,我们读取了 server.key 和 server.pem 这类证书凭证文件。经过一系列处理获取 tls.Config 作为 HTTP2 的使用参数。
4、重新编写核心文件 server/server.go 修改server目录下的server.go文件,该文件是我们服务里的核心文件,写入内容:
1
2
3
4
5
6
7
8
9
10
11
12
13
14
15
16
17
18
19
20
21
22
23
24
25
26
27
28
29
30
31
32
33
34
35
36
37
38
39
40
41
42
43
44
45
46
47
48
49
50
51
52
53
54
55
56
57
58
59
60
61
62
63
64
65
66
67
68
69
70
71
72
73
74
75
76
77
78
79
80
81
82
83
84
85
86
87
88
89
90
91
92
93
94
95
96
97
98
99
100
101
102
package serverimport ( "context" "crypto/tls" "github.com/grpc-ecosystem/grpc-gateway/v2/runtime" "google.golang.org/grpc" "google.golang.org/grpc/credentials" "grpc-gateway-example/pkg/util" "grpc-gateway-example/proto/helloworld" "log" "net" "net/http" ) var ( ServerPort string CertName string CertPemPath string CertKeyPath string EndPoint string ) func Serve () error ) { EndPoint = ":" + ServerPort conn, err := net.Listen("tcp" , EndPoint) if err != nil { log.Printf("TCP Listen err:%v\n" , err) } tlsConfig := util.GetTLSConfig(CertPemPath, CertKeyPath) srv := createInternalServer(conn, tlsConfig) log.Printf("gRPC and https listen on: %s\n" , ServerPort) if err = srv.Serve(tls.NewListener(conn, tlsConfig)); err != nil { log.Printf("ListenAndServe: %v\n" , err) } return err } func createInternalServer (conn net.Listener, tlsConfig *tls.Config) var opts []grpc.ServerOption creds, err := credentials.NewServerTLSFromFile(CertPemPath, CertKeyPath) if err != nil { log.Printf("Failed to create server TLS credentials %v" , err) } opts = append (opts, grpc.Creds(creds)) grpcServer := grpc.NewServer(opts...) helloworld.RegisterHelloServer(grpcServer, NewHelloService()) ctx := context.Background() dcreds, err := credentials.NewClientTLSFromFile(CertPemPath, CertName) if err != nil { log.Printf("Failed to create client TLS credentials %v" , err) } dopts := []grpc.DialOption{grpc.WithTransportCredentials(dcreds)} gwmux := runtime.NewServeMux() if err := helloworld.RegisterHelloHandlerFromEndpoint(ctx, gwmux, EndPoint, dopts); err != nil { log.Printf("Failed to register gw server: %v\n" , err) } mux := http.NewServeMux() mux.Handle("/" , gwmux) return &http.Server{ Addr: EndPoint, Handler: util.GrpcHandlerFunc(grpcServer, mux), TLSConfig: tlsConfig, } }
5、server流程刨析 1)启动监听 net.Listen("tcp", EndPoint) 函数用于监听本地网络地址的监听。其函数原型Listen(ctx context.Context, network, address string) (Listener, error)
参数:
network:必须是tcp, tcp4, tcp6, unix或unixpacket。
address:对于TCP网络,如果address参数中的host为空或未指定的IP地址,则会自动返回一个可用的端口或者IP地址。
net.Listen(“tcp”, EndPoint)函数返回值是Listener:
1
2
3
4
5
6
7
8
9
10
type Listener interface { Accept() (Conn, error ) Close() error Addr() Addr }
net.Listen 会返回一个监听器的结构体,返回接下来的动作,让其执行下一步的操作,可用执行以下操作Accept、Close、Addr。
2)获取TLSConfig 通过调用 util.GetTLSConfig 函数解析得到 tls.Config,通过传达给 createInternalServer函数完成 http.Server 服务的 TLSConfig 配置项使用。
3)创建内部服务 程序采用HTTP2、HTTPS,需要支持TLS,在启动 grpc.NewServer() 前需要将serverOptions(服务器选项,类似于中间件,可用设置例如凭证、编解码器和保持存活参数等选项。),而前面所获取的 tlsConfig 仅能给HTTP使用,因此第一步我们要创建 grpc 的 TLS 认证凭证。
创建 grpc 的 TLS 认证凭证google.golang.org/grpc/credentials 第三方包,credentials 包实现gRPC库支持的各种凭据,这些凭据封装了客户机与服务器进行身份验证所需的所有状态,并进行各种断言,例如,关于客户机的身份、角色或是否授权进行特定调用。
我们调用 NewServerTLSFromFile 它能够从服务器的输入证书文件和密钥文件构造TLS凭据。
1
2
3
4
5
6
7
8
9
func NewServerTLSFromFile (certFile, keyFile string ) error ) { cert, err := tls.LoadX509KeyPair(certFile, keyFile) if err != nil { return nil , err } return NewTLS(&tls.Config{Certificates: []tls.Certificate{cert}}), nil }
grpc ServerOption
grpc.Creds() 其原型为func Creds(c credentials.TransportCredentials) ServerOption,返回一个为服务器连接设置凭据的ServerOption。
创建 grpc 服务端ServerOption
注册grpc服务
1 2 helloworld.RegisterHelloServer(grpcServer, NewHelloService())
创建 grpc-gateway 关联组件
1 2 3 4 5 6 7 8 9 10 11 ctx := context.Background() dcreds, err := credentials.NewClientTLSFromFile(CertPemPath, CertName) if err != nil { log.Printf("Failed to create client TLS credentials %v" , err) } dopts := []grpc.DialOption{grpc.WithTransportCredentials(dcreds)}
创建HTTP NewServeMux及注册 grpc-gateway 逻辑
1 2 3 4 5 6 7 8 9 10 11 12 13 14 15 gwmux := runtime.NewServeMux() if err := helloworld.RegisterHelloHandlerFromEndpoint(ctx, gwmux, EndPoint, dopts); err != nil { log.Printf("Failed to register gw server: %v\n" , err) } mux := http.NewServeMux() mux.Handle("/" , gwmux)
注册具体服务
1 2 3 4 if err := helloworld.RegisterHelloHandlerFromEndpoint(ctx, gwmux, EndPoint, dopts); err != nil { log.Printf("Failed to register gw server: %v\n" , err) }
ctx:上下文
gwmux:grpc-gateway 的请求多路复用器
EndPoint:服务网络地址
dopts:配置好的安全凭据
4)创建Listener 1 2 3 4 5 if err = srv.Serve(tls.NewListener(conn, tlsConfig)); err != nil { log.Printf("ListenAndServe: %v\n" , err) }
5)服务接受请求 我们调用 srv.Serve(tls.NewListener(conn, tlsConfig))它是http.Server的方法,并且需要一个Listener作为参数。
1 2 3 4 5 6 7 8 9 10 11 12 13 14 15 func (srv *Server) error { ... defer l.Close() ... baseCtx := context.Background() ... ctx := context.WithValue(baseCtx, ServerContextKey, srv) for { rw, e := l.Accept() ... c := srv.newConn(rw) c.setState(c.rwc, StateNew, runHooks) go c.serve(ctx) } }
它创建了一个 context.Background() 上下文对象,并调用 Listener 的 Accept 方法开始接受请求,在获取到连接数据后使用 newConn 创建连接对象,在最后使用goroutine的方式处理连接请求,完成请求后自动关闭连接。
五、验证功能 1、编写 client 在目录client下,创建 main.go 文件,新增以下内容:
1 2 3 4 5 6 7 8 9 10 11 12 13 14 15 16 17 18 19 20 21 22 23 24 25 26 27 28 29 30 31 32 33 34 35 36 package mainimport ( "golang.org/x/net/context" "google.golang.org/grpc" "google.golang.org/grpc/credentials" "grpc-gateway-example/proto/helloworld" "log" ) func main () creds, err := credentials.NewClientTLSFromFile("./certs/server.pem" , "grpc-gateway-example" ) if err != nil { log.Println("Failed to create TLS credentials %v" , err) return } conn, err := grpc.Dial(":50052" , grpc.WithTransportCredentials(creds)) defer conn.Close() if err != nil { log.Println(err) } c := helloworld.NewHelloClient(conn) ct := context.Background() body := &helloworld.HelloRequest{ Referer: "Grpc" , } r, err := c.SayHello(ct, body) if err != nil { log.Println(err) } log.Println(r) }
2、启动 & 请求 1 2 3 4 5 6 7 # 启动服务端 $ go run main.go server 2022 /11 /10 16 :34 :06 gRPC and https listen on: 50052 # 启动客户端 $ go run client/main.go 2022 /11 /10 16 :34 :43 message:"hello grpc-gateway"
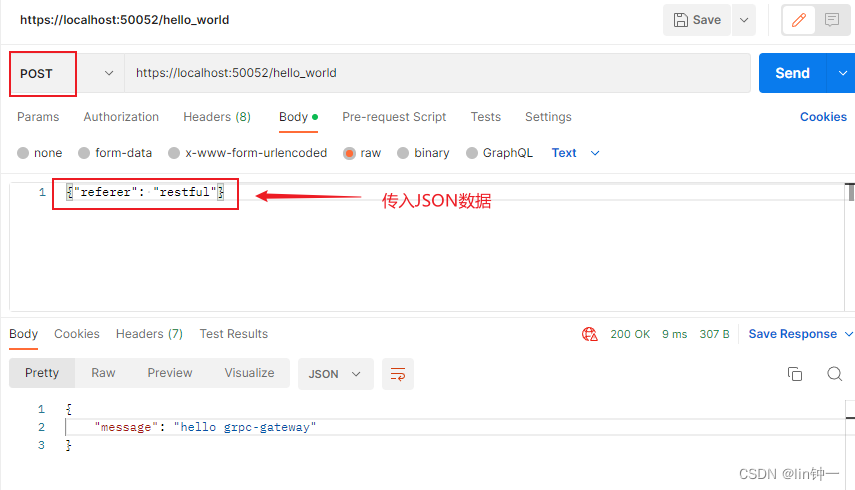
执行测试Restful Api,用POST方式访问https://localhost:50052/hello_world
六、最终目录结构 1 2 3 4 5 6 7 8 9 10 11 12 13 14 15 16 17 18 19 20 21 22 23 24 25 26 27 28 29 30 31 32 33 34 35 grpc-gateway-example/ ├── certs │ ├── ca.conf │ ├── ca.crt │ ├── ca.csr │ ├── ca.key │ ├── server.conf │ ├── server.csr │ ├── server.key │ └── server.pem ├── client │ └── main.go ├── cmd │ ├── root.go │ └── server.go ├── pkg │ └── util │ │ │ ├── grpc.go │ │ │ └── tls.go ├── proto │ ├── google │ │ └── api │ │ │ ├── annotations.proto │ │ │ └── http.proto │ │ └── protobuf │ │ │ └── descriptor.proto │ ├── helloworld │ │ ├── hello.pb.go │ │ ├── hello.pb.gw.go │ │ └── hello_grpc.pb.go │ ├── hello.proto ├── server │ └── server.go ├── main.go └── Makefile
参考:https://developer.aliyun.com/article/879486 https://eddycjy.com/posts/go/grpc-gateway/2018-02-27-hello-world/