一、组件基础
通常一个应用会以一棵嵌套的组件树的形式来组织:
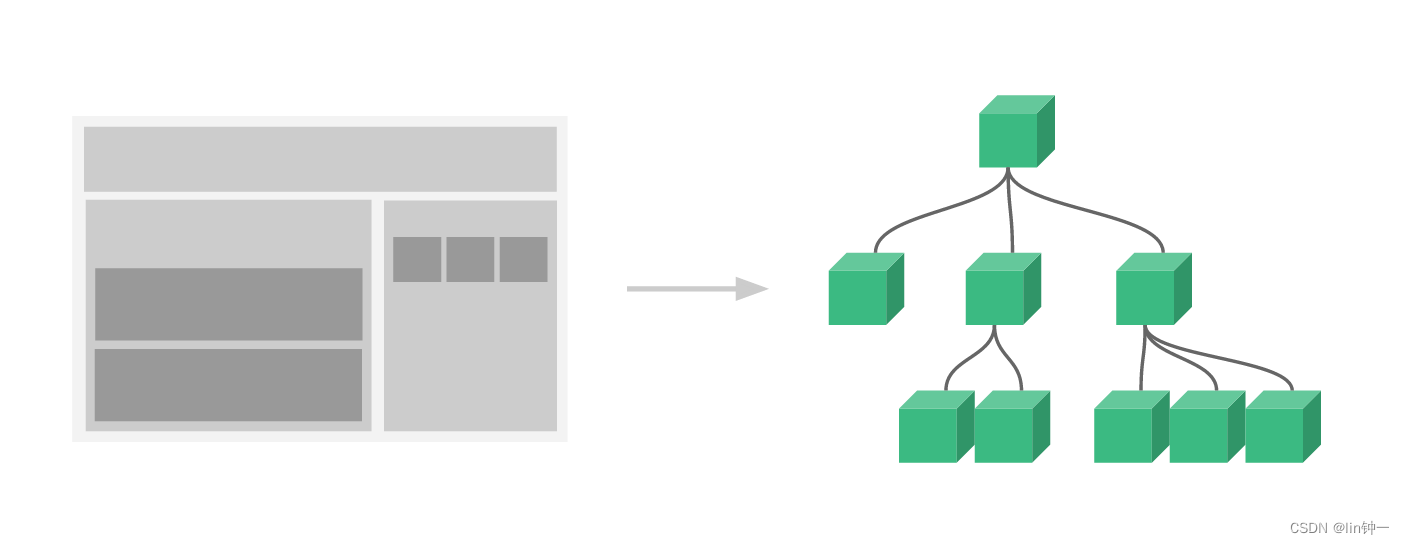
例如,你可能会有页头、侧边栏、内容区等组件,每个组件又包含了其它的像导航链接、博文之类的组件。
1、为什么我们要用组件
了解传统方式到组件化方式的更新。
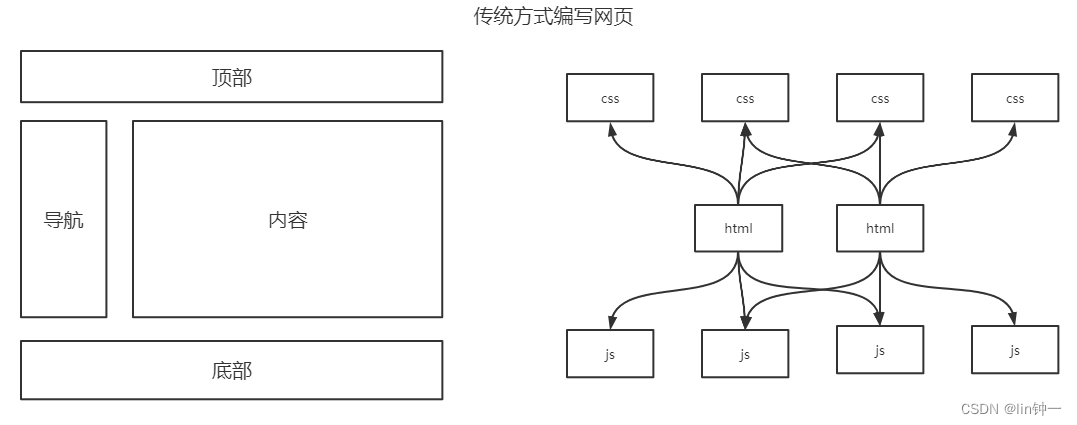
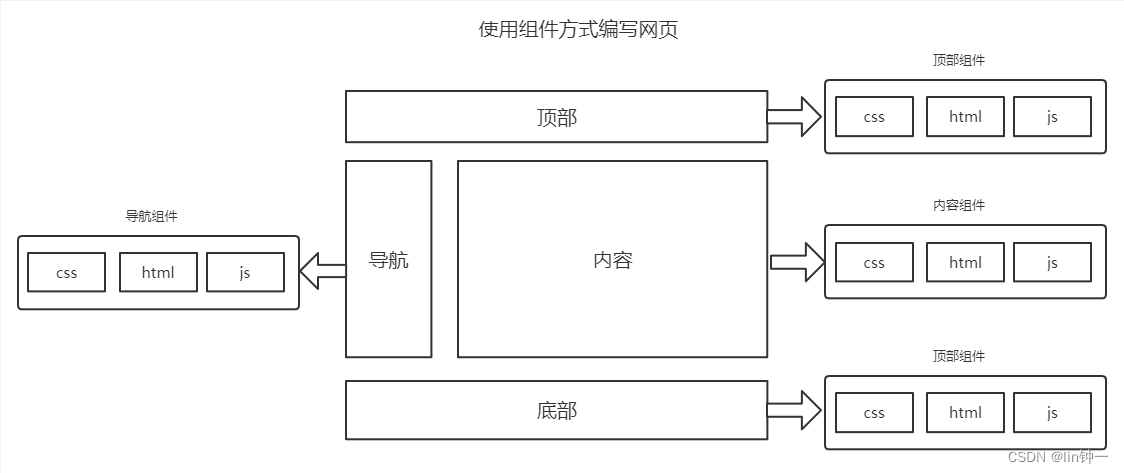
传统方式编写网页,会导致依赖关系混乱,代码复用率低,所以我们需要用到组件,不同组件的用来实现局部功能的代码和资源。
2、基本使用
为了能在模板中使用,这些组件必须先注册以便 Vue 能够识别。这里有两种组件的注册类型:全局注册和局部注册。至此,我们的组件都只是通过 component 方法全局注册的:
1)全局注册
组件是用来实现局部功能的代码和资源的集合,是带有名称的可复用实例
1
2
3
4
5
| const app = Vue.createApp({})
app.component('my-component-name', {
})
|
全局注册的组件可以在应用中的任何组件的模板中使用。
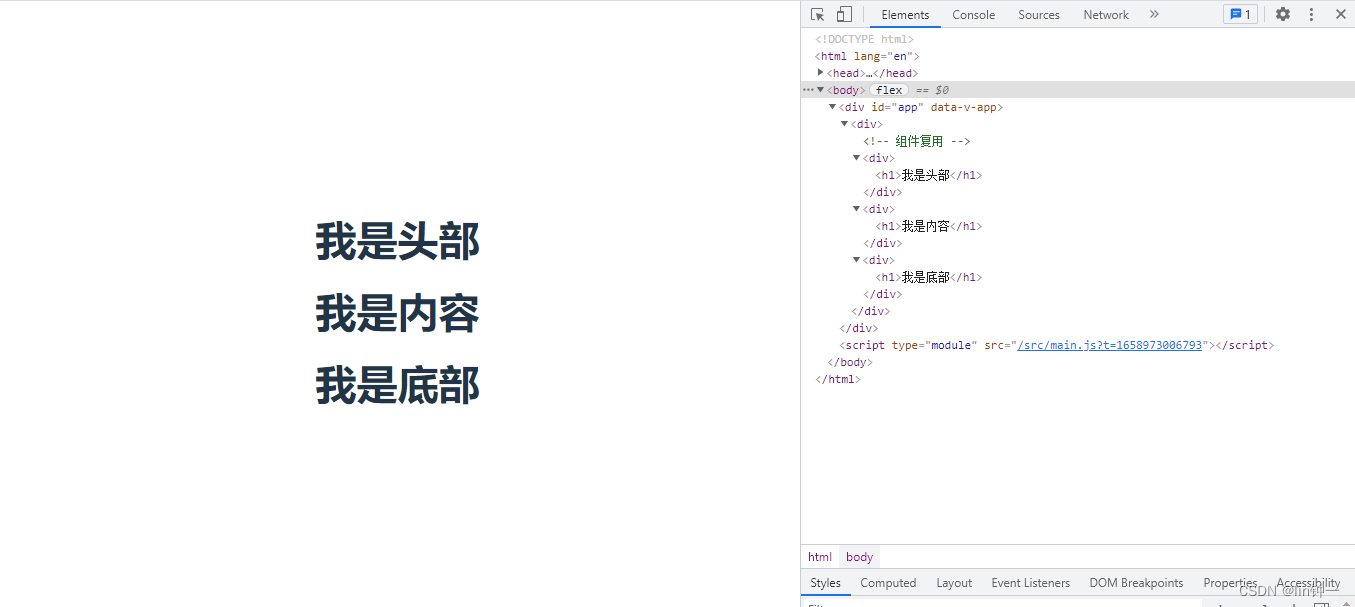
2)局部注册
父组件 App.vue
子组件 header.vue、message.vue、bottom.vue
1
2
3
4
5
6
7
8
9
10
11
12
13
| <script>
export default {
data() {
return {
msg: "这里是头部子组件"
}
}
}
</script>
<template>
<h1>{{ msg }}</h1>
</template>
|
1
2
3
4
5
6
7
8
9
10
11
12
13
| <script>
export default {
data() {
return {
msg: "这里是内容子组件"
}
}
}
</script>
<template>
<h1>{{ msg }}</h1>
</template>
|
1
2
3
4
5
6
7
8
9
10
11
12
13
| <script>
export default {
data() {
return {
msg: "这里是底部子组件"
}
}
}
</script>
<template>
<h1>{{ msg }}</h1>
</template>
|
1
2
3
4
5
6
7
8
9
10
11
12
13
14
15
16
17
18
19
20
21
22
23
24
25
26
| <script>
import heade from "./components/header.vue"
import bottom from "./components/bottom.vue"
import message from "./components/message.vue"
export default {
components: {
heade,
bottom,
message,
}
};
</script>
<template>
<div>
<heade></heade>
</div>
<div>
<message></message>
</div>
<div>
<bottom></bottom>
</div>
</template>
|

3、通过 Prop 向子组件传递数据
Prop 是你可以在组件上注册的一些自定义 attribute。为了给hello子组件传递一个message,我们可以用 props 选项将其包含在该组件可接受的 prop 列表中:
1)传递值
App.vue
1
2
3
4
5
6
7
8
9
10
11
12
13
14
15
16
17
18
19
20
21
22
| <script>
import hello from './components/hello.vue'
export default {
data() {
return {
}
},
components: {
hello
}
};
</script>
<template>
<div>
<hello title="我是头部"></hello>
<hello title="我是内容"></hello>
<hello title="我是底部"></hello>
</div>
</template >
|
hello.vue
1
2
3
4
5
6
7
8
9
10
| <script>
export default {
props: ['title'],
}
</script>
<template>
<div>
<h1>{{ title }}</h1>
</div>
</template>
|
当一个值被传递给一个 prop attribute 时,它就成为该组件实例中的一个 property。该 property 的值可以在模板中访问,就像任何其他组件 property 一样。
一个组件可以拥有任意数量的 prop,并且在默认情况下,无论任何值都可以传递给 prop。
2)用 v-bind 来动态传递 prop
App.vue
1
2
3
4
5
6
7
8
9
10
11
12
13
14
15
16
17
18
19
20
21
22
| <script>
import hello from './components/hello.vue'
export default {
data() {
return {
message: "hello vue",
}
},
components: {
hello
}
};
</script>
<template>
<div>
<hello :msg="message"></hello>
<h1>父组件中</h1>
<input type="text" v-model="message">
</div>
</template >
|
hello.vue
1
2
3
4
5
6
7
8
9
10
11
| <script>
export default {
props: ['msg'],
}
</script>
<template>
<div>
<h1>hello子组件中</h1>
<h1>{{ msg }}</h1>
</div>
</template>
|
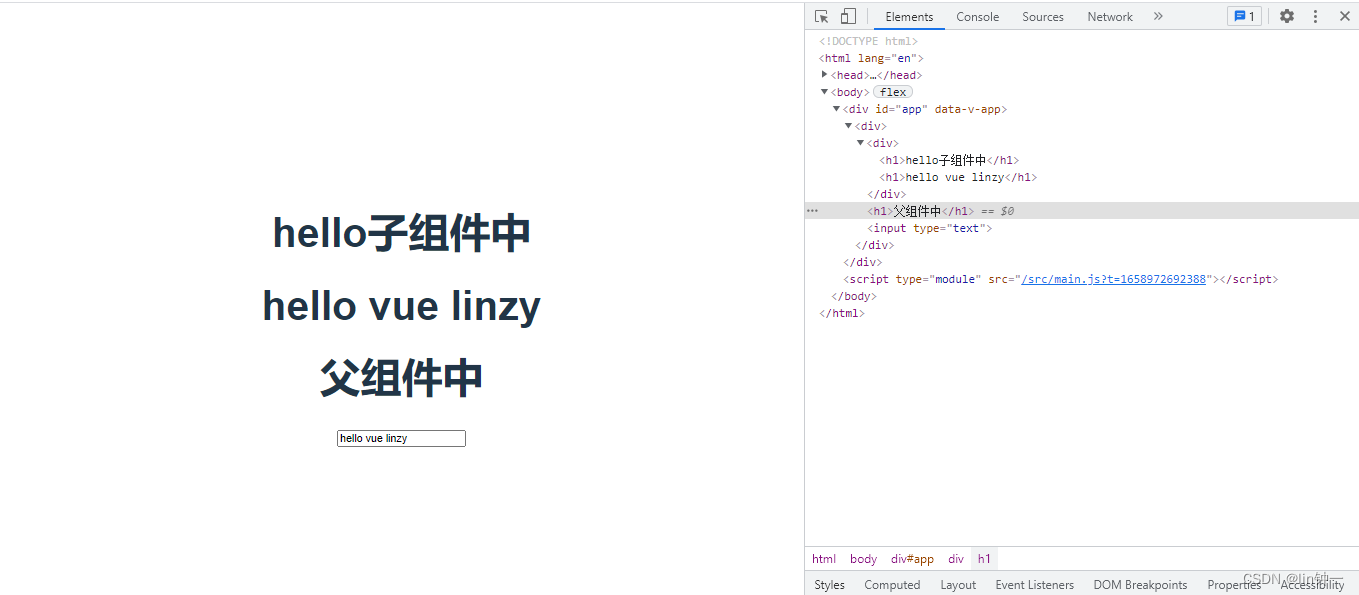
我们传递给子组件的值是双向绑定的,我在父组件更新内容,子组件也会同样获取更新后的内容
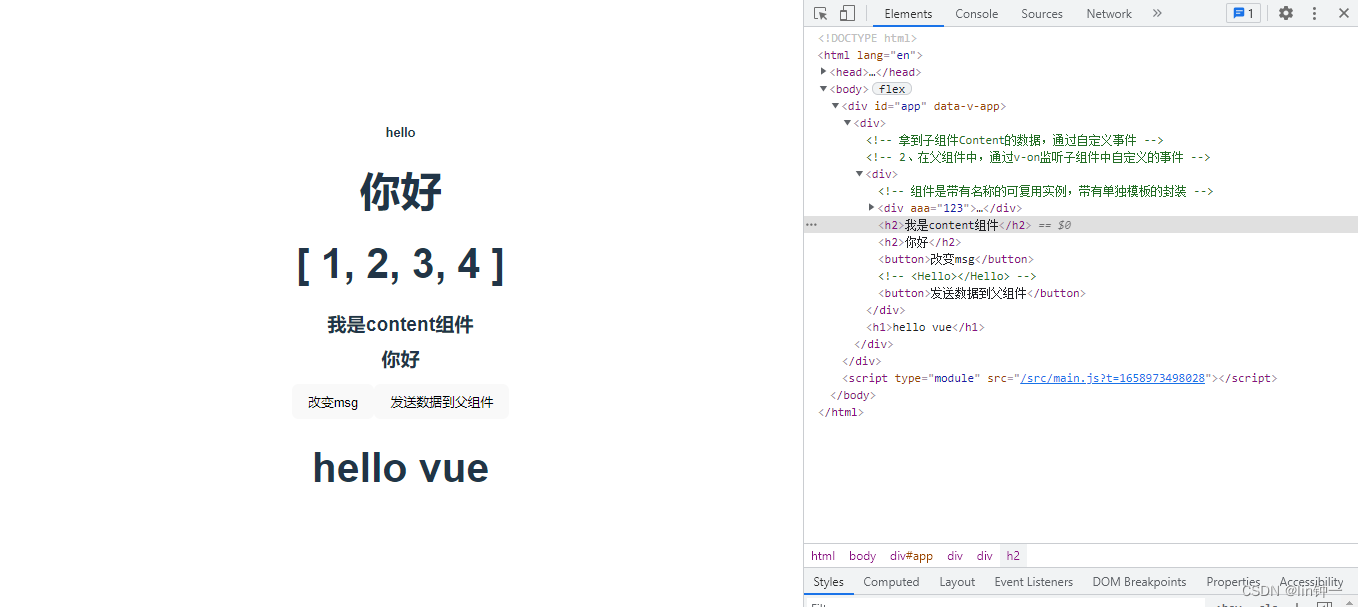
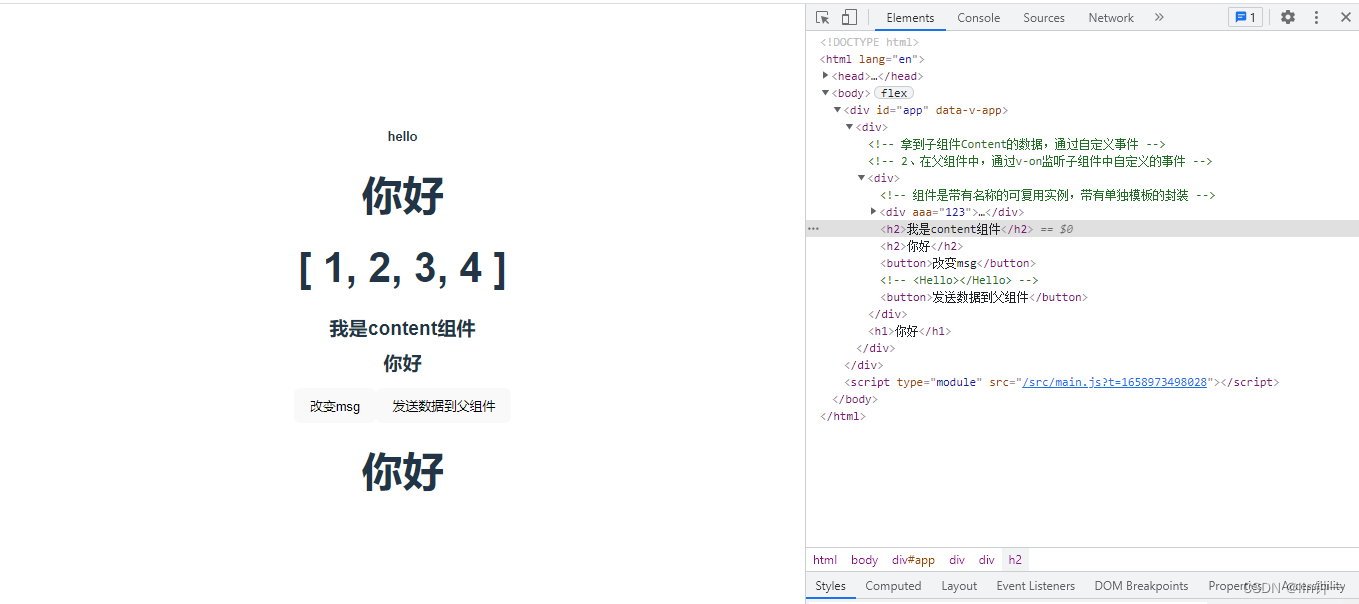
4、监听子组件事件
我们在开发子组件时,它的一些功能可能需要与父级组件进行沟通,例如我在子组件改变特定值时,我们想要父组件也同样接收到,就需要父组件去监听子组件事件
父组件去监听子组件事件
- 在子组件中设置方法,通过$emit来触发事件
- 在父组件中,通过v-on监听子组件中自定义的事件,接收子组件传来的值
App.vue
1
2
3
4
5
6
7
8
9
10
11
12
13
14
15
16
17
18
19
20
21
22
23
24
25
26
27
28
29
| <script>
import Content from './components/Content.vue'
export default {
data() {
return {
message: "hello vue",
}
},
components: {
Content
},
methods: {
getMsg: function (msg) {
console.log(msg);
this.message = msg
}
}
};
</script>
<template>
<div>
<content @injectMsg="getMsg"></content>
<h1>{{ message }}</h1>
</div>
</template>
|
父级组件可以像处理原生 DOM 事件一样通过 v-on 或 @ 监听子组件实例的任意事件
content.vue
1
2
3
4
5
6
7
8
9
10
11
12
13
14
15
16
17
18
19
20
21
22
23
24
25
26
27
28
29
30
31
32
33
34
| <script>
import Hello from './HelloWorld.vue'
export default {
data() {
return {
msg: "我是content",
list: [1, 2, 3, 4]
}
},
components: {
Hello
},
methods: {
sendParent: function () {
this.$emit('injectMsg', this.msg)
}
}
}
</script>
<template>
<div>
<Hello :message="msg" aaa="123" :list="list"></Hello>
<h2>我是content组件</h2>
<h2>{{ msg }}</h2>
<button @click="msg = '你好'">改变msg</button>
<button @click="sendParent">发送数据到父组件</button>
</div>
</template>
|
同时子组件可以通过调用内建的 $emit 方法并传入事件名称来触发一个事件
helloworld.vue
1
2
3
4
5
6
7
8
9
10
11
12
13
14
15
16
17
18
19
20
21
22
23
24
25
26
27
28
29
30
31
32
33
34
35
36
37
| <script>
export default {
data() {
return {
msg: "我是hello"
}
},
props: {
message: String,
message: {
type: String,
default: "我是linzy",
required: true,
},
list: {
type: Array,
default: [],
}
},
mounted() {
console.log(this.$parent);
console.log(this.$root);
}
}
</script>
<template>
<div>
<h4>hello</h4>
<h1>{{ message }}</h1>
<h1>{{ list }}</h1>
</div>
</template>
|
我们可以把props变为对象形式,这样我们在接收到的值进行条件限定,可以限定类型、设置默认值、必须传入值等。
5、插槽
和 HTML 元素一样,我们经常需要向一个组件传递内容,就是我们使用 < slot> 作为我们想要插入内容的占位符
1)插槽内容
App.vue
1
2
3
4
5
6
7
8
9
10
11
12
13
14
15
16
17
18
19
20
21
22
23
24
25
| <script>
import Content from './components/Content.vue'
export default {
data() {
return {
message: "hello vue",
}
},
components: {
Content
}
};
</script>
<template>
<div>
<Content>我是插槽</Content>
<Content><button>按钮</button></Content>
<Content><input type="text"></Content>
</div>
</template>
|
content.vue
1
2
3
4
5
6
7
8
| <template>
<div>
<h1>我是Content组件</h1>
<div>
<slot></slot>
</div>
</div>
</template>
|
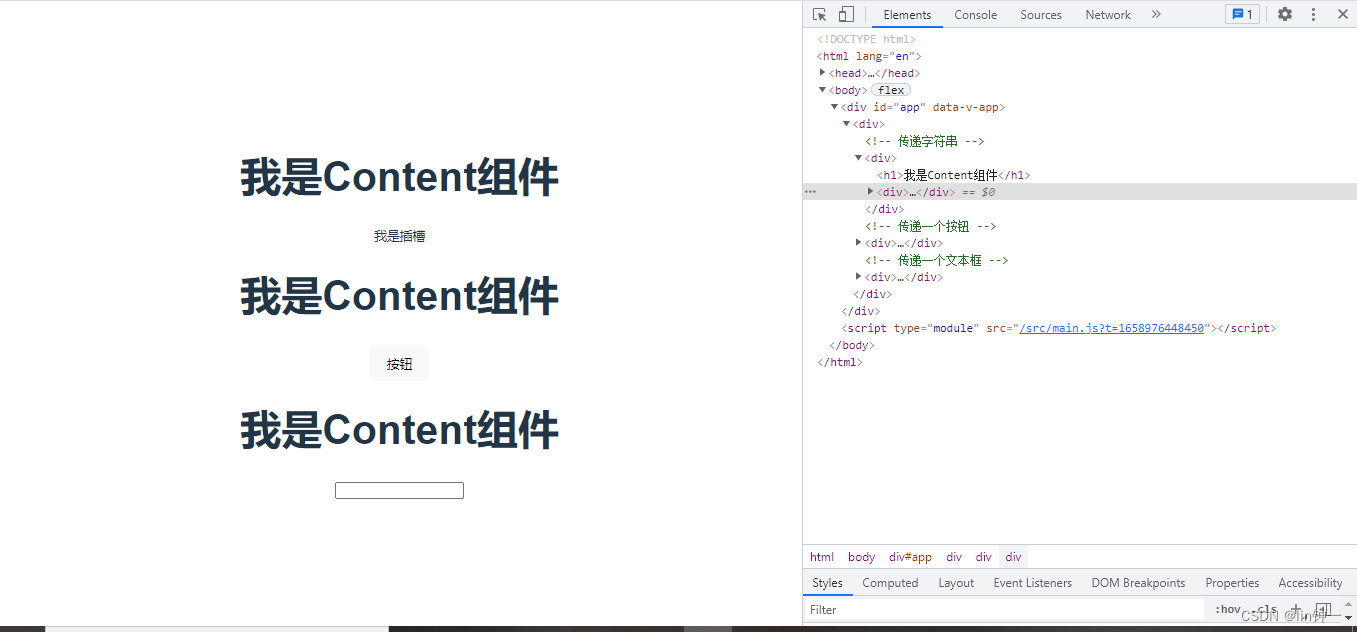
如果有多个值,同时放入组件进行替换时,一起作为替换元素
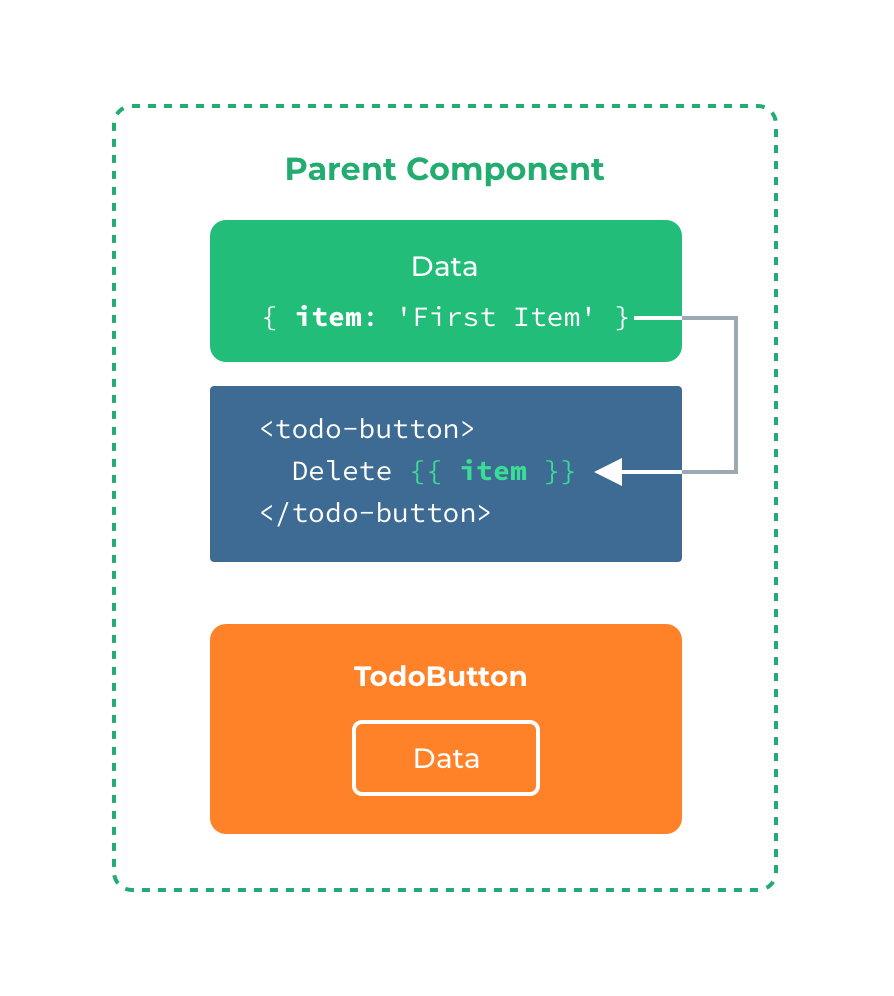
2)渲染作用域
父级模板里的所有内容都在父级作用域中编译 子模板里的所有内容都是在子作用域中编译
1
2
3
| <todo-button>
Delete a {{ item.name }}
</todo-button>
|
3)备用内容
有时为一个插槽指定备用 (也就是默认的) 内容是很有用的,它只会在没有提供内容的时候被渲染。例如在一个 组件中:
1
2
3
| <button type="submit">
<slot>Submit</slot>
</button>
|
现在当我们在一个父级组件中使用 并且不提供任何插槽内容时
1
| <submit-button></submit-button>
|
备用内容“Submit”将会被渲染:
1
2
3
| <button type="submit">
Submit
</button>
|
但是如果我们提供内容,则这个提供的内容将会被渲染从而取代备用内容
4)具名插槽
有时我们需要多个插槽,具名插槽可以根据slot的name进行分配,< slot> 元素有一个特殊的 attribute:name。通过它可以为不同的插槽分配独立的 ID,也就能够以此来决定内容应该渲染到什么地方。
1
2
3
4
5
6
7
8
9
10
11
| <template>
<div>
<h1>我是Content组件</h1>
<div>
<slot></slot>
<slot name="header"></slot>
<slot name="main"></slot>
<slot name="bottom"></slot>
</div>
</div>
</template>
|
一个不带 name 的 出口会带有隐含的名字“default”。
在向具名插槽提供内容的时候,我们可以在一个 < template> 元素上使用 v-slot 指令,并以 v-slot 的参数的形式提供其名称:
1
2
3
4
5
6
7
8
9
10
11
12
13
14
15
16
17
18
19
20
21
22
23
24
25
| <script>
import Content from './components/Content.vue'
export default {
components: {
Content
}
};
</script>
<template>
<div>
<Content>
<template v-slot:default>
<p>我不是具名插槽.</p>
</template>
<template v-slot:header><button>header按钮</button></template>
<template v-slot:main><input type="text" value="main文本框"></template>
<template v-slot:bottom>
<h1>我是bottom插槽</h1>
</template>
</Content>
</div>
</template>
|
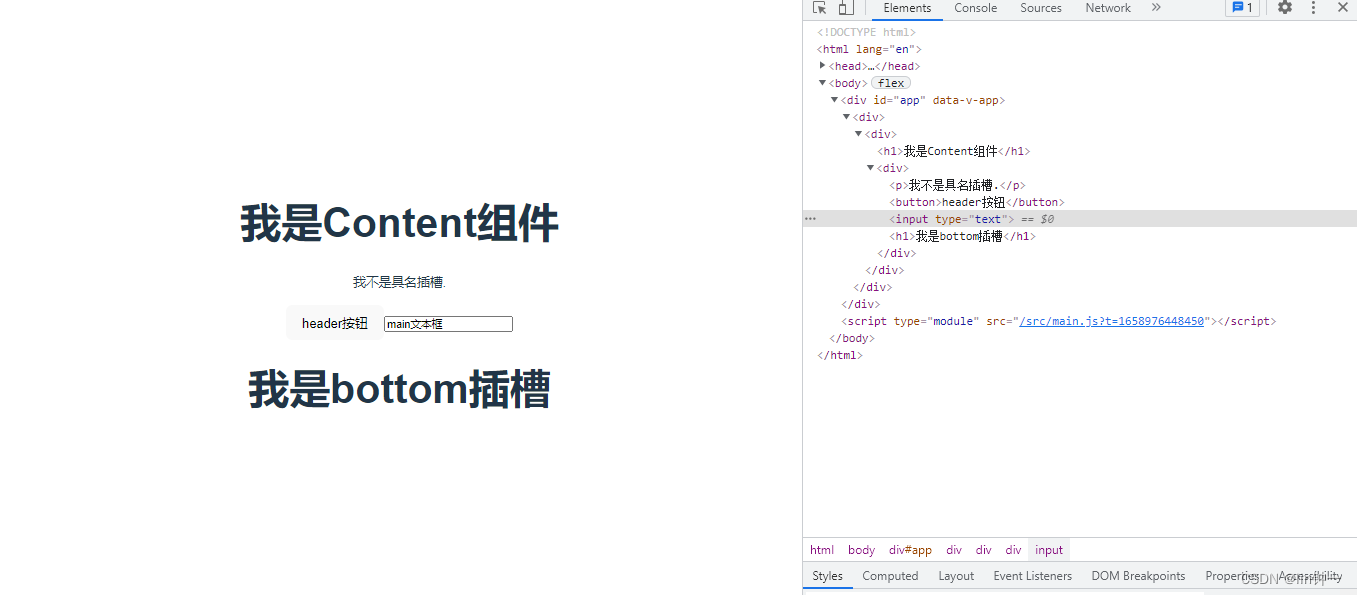
注意,v-slot 只能添加在 < template> 上
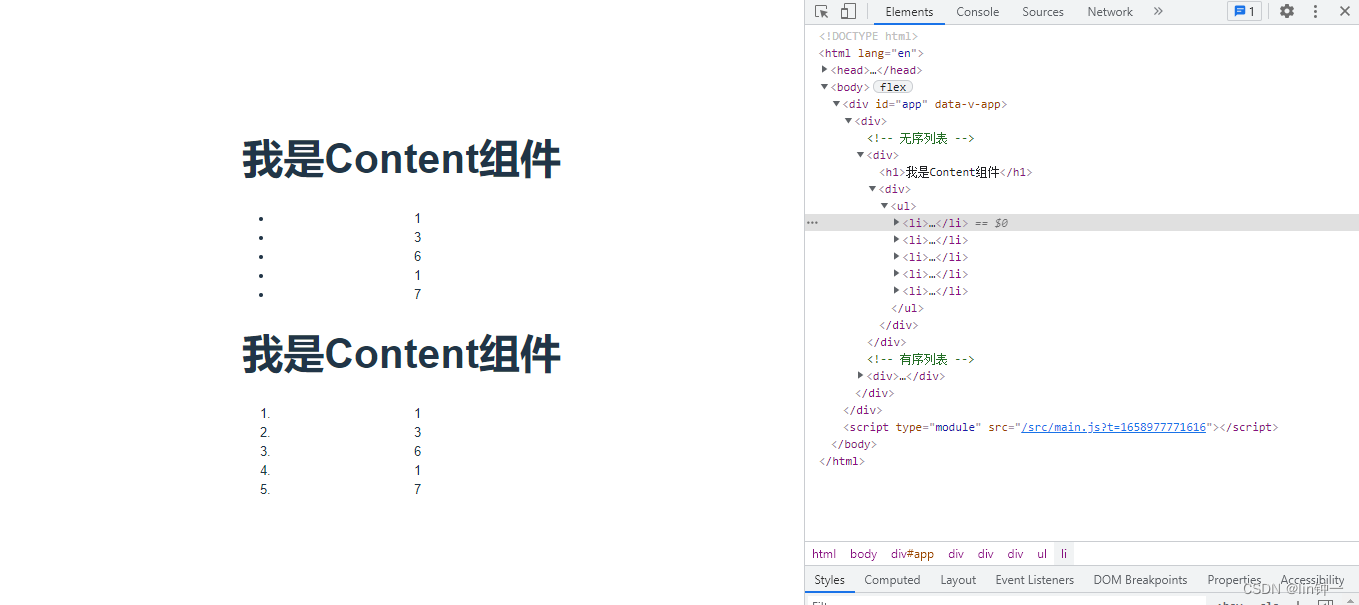
5)作用域插槽
有时让插槽内容能够访问子组件中才有的数据是很有用的。当一个组件被用来渲染一个项目数组时,这是一个常见的情况,我们希望能够自定义每个项目的渲染方式。
简而言之,可能每个页面插槽渲染的数据可能会不同,所以我们通过访问子组件中的数据来渲染,来实现相同的效果
App.vue
1
2
3
4
5
6
7
8
9
10
11
12
13
14
15
16
17
18
19
20
21
22
23
24
25
26
27
28
29
30
| <script>
import Content from './components/Content.vue'
export default {
components: {
Content
}
};
</script>
<template>
<div>
<Content>
<template v-slot:default="slotProps">
<ul>
<li v-for="item in slotProps.item" :key="item">{{ item }}</li>
</ul>
</template>
</Content>
<Content>
<template v-slot:default="slotProps">
<ol>
<li v-for="item in slotProps.item" :key="item">{{ item }}</li>
</ol>
</template>
</Content>
</div>
</template>
|
content.vue
1
2
3
4
5
6
7
8
9
10
11
12
13
14
15
16
17
18
19
| <script>
export default {
data() {
return {
arr: [1, 3, 6, 1, 7]
}
}
}
</script>
<template>
<div>
<h1>我是Content组件</h1>
<div>
<slot :item="arr"></slot>
</div>
</div>
</template>
|

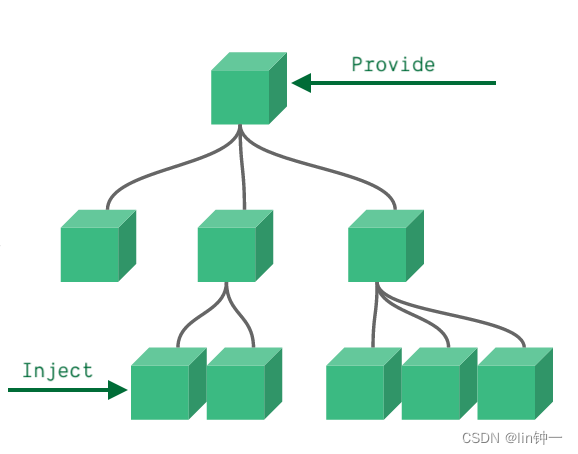
6、跨级通信Provide / Inject
通常,当我们需要从父组件向子组件传递数据时,我们使用 props。想象一下这样的结构:有一些深度嵌套的组件,而深层的子组件只需要父组件的部分内容。在这种情况下,如果仍然将 prop 沿着组件链逐级传递下去,可能会很麻烦。
对于这种情况,我们可以使用一对 provide 和 inject。无论组件层次结构有多深,父组件都可以作为其所有子组件的依赖提供者。这个特性有两个部分:父组件有一个 provide 选项来提供数据,子组件有一个 inject 选项来开始使用这些数据。
例如,我们有这样的层次结构:
1
2
3
4
5
6
| Root
└─ TodoList
├─ TodoItem
└─ TodoListFooter
├─ ClearTodosButton
└─ TodoListStatistics
|
如果要将 todo-items 的长度直接传递给 TodoListStatistics,我们要将 prop 逐级传递下去:TodoList -> TodoListFooter -> TodoListStatistics。通过 provide/inject 的方式,我们可以直接执行以下操作:
- 祖先组件用provide值传递
- 子孙组件用inject接收值传递
1)值传递/引用传递
App.vue
1
2
3
4
5
6
7
8
9
10
11
12
13
14
15
16
17
18
19
20
21
22
23
24
25
26
27
28
29
30
31
32
33
34
35
36
37
38
39
40
41
42
| <script>
import Content from "./components/Content.vue"
export default {
data() {
return {
message: "hello vue",
obj: {
message: "hello linzy",
}
}
},
components: {
Content
},
provide() {
return {
message: this.message,
obj: this.obj
}
}
};
</script>
<template>
<div>
<h1>HomeView----{{ message }}</h1>
<h1>HomeView----{{ obj.message }}</h1>
<p>--------------------</p>
<Content></Content>
<button @click="message = '勇敢牛牛'">改变message按钮</button>
<button @click="obj.message = '哈哈哈'">改变对象里的message按钮</button>
</div>
</template>
|
content.vue
1
2
3
4
5
6
7
8
9
10
11
12
13
| <script>
export default {
inject: ['message'],
inject: ['obj']
}
</script>
<template>
<h2>hello---{{ obj.message }}</h2>
<h1>{{ message }}</h1>
</template>
|
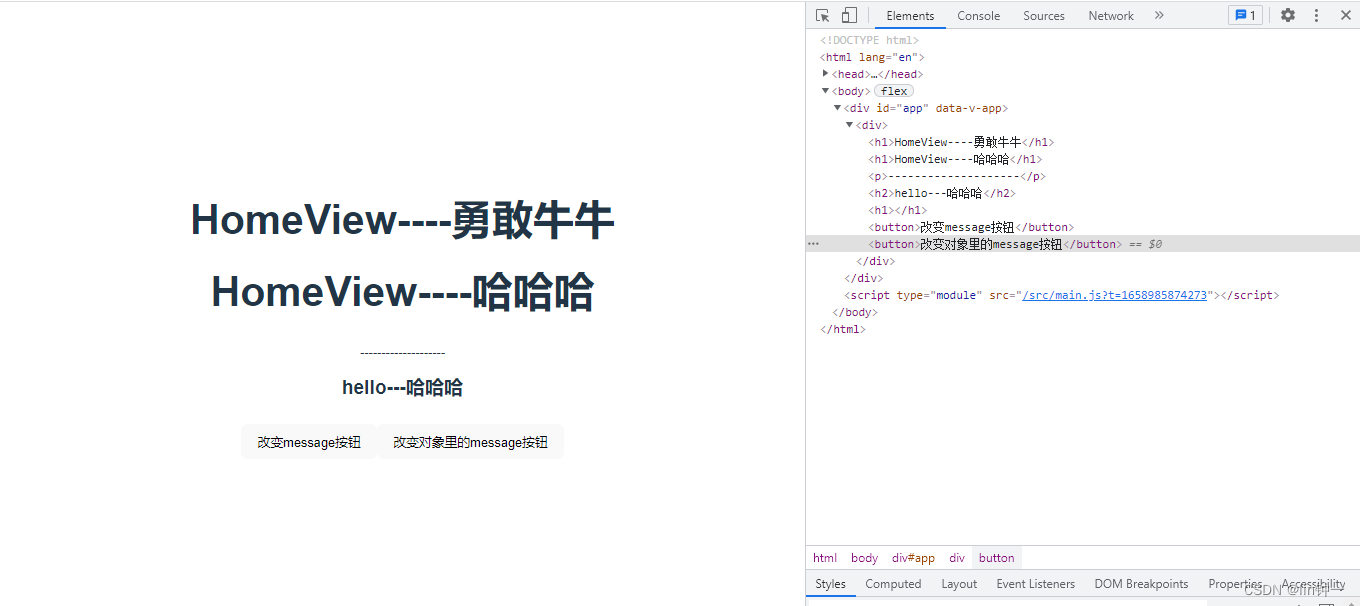
注意:值传递就相当于,在子组件开辟了新的属性变量,跟父组件的属性变量没有关系了,引用传递,可以看做c语言里的指针的概念,传递了一个地址,都是属于一个内存空间的,所以子组件里对象的属性变量改变了,父组件的也会改变
父组件不需要知道哪些子组件使用了它 provide 的 property
子组件不需要知道 inject 的 property 来自哪里
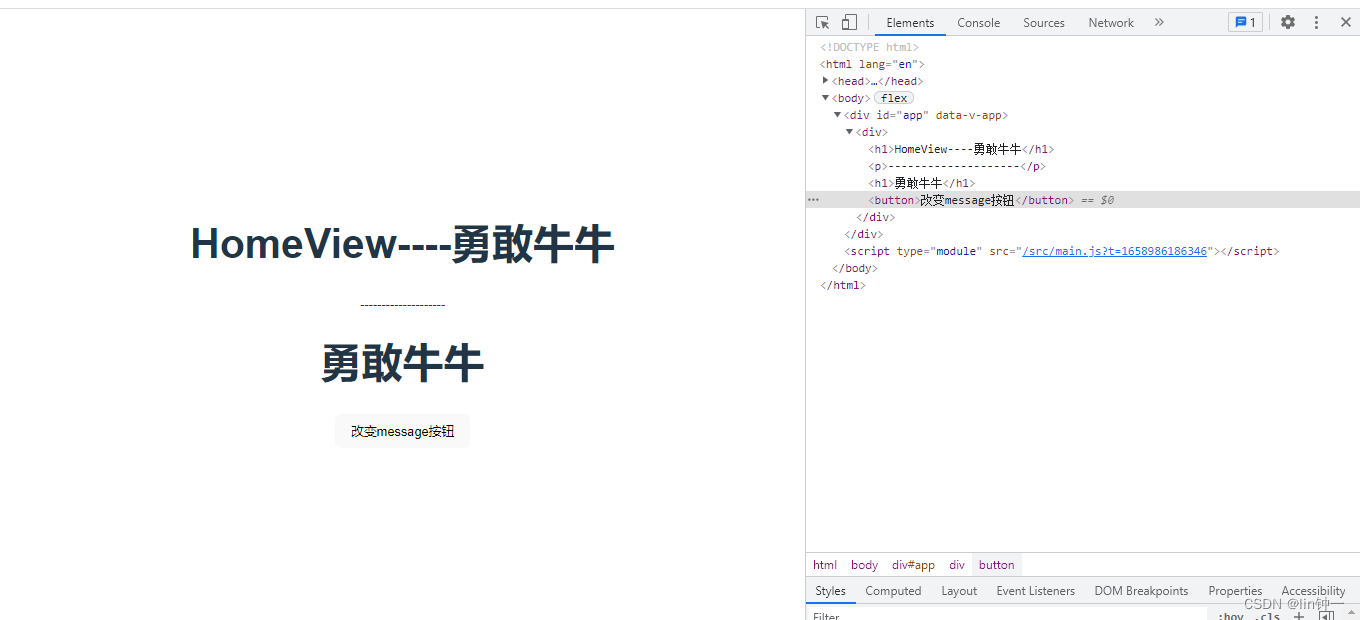
2)处理响应性
这是因为默认情况下,provide/inject 绑定并不是响应式的。
我们可以通过传递一个 ref property 或 reactive 对象给 provide 来改变这种行为。在我们的例子中,如果我们想对祖先组件中的更改做出响应。
App.vue
1
2
3
4
5
6
7
8
9
10
11
12
13
14
15
16
17
18
19
20
21
22
23
24
25
26
27
28
29
30
31
32
33
34
35
| <script>
import Content from "./components/Content.vue"
export default {
data() {
return {
message: "hello vue",
obj: {
message: "hello linzy",
}
}
},
components: {
Content
},
provide() {
return {
message: () => this.message,
}
}
};
</script>
<template>
<div>
<h1>HomeView----{{ message }}</h1>
<p>--------------------</p>
<Content></Content>
<button @click="message = '勇敢牛牛'">改变message按钮</button>
</div>
</template>
|
content.vue
1
2
3
4
5
6
7
8
9
10
| <script>
export default {
inject: ['message'],
}
</script>
<template>
<h1>{{ message() }}</h1>
</template>
|
二、生命周期
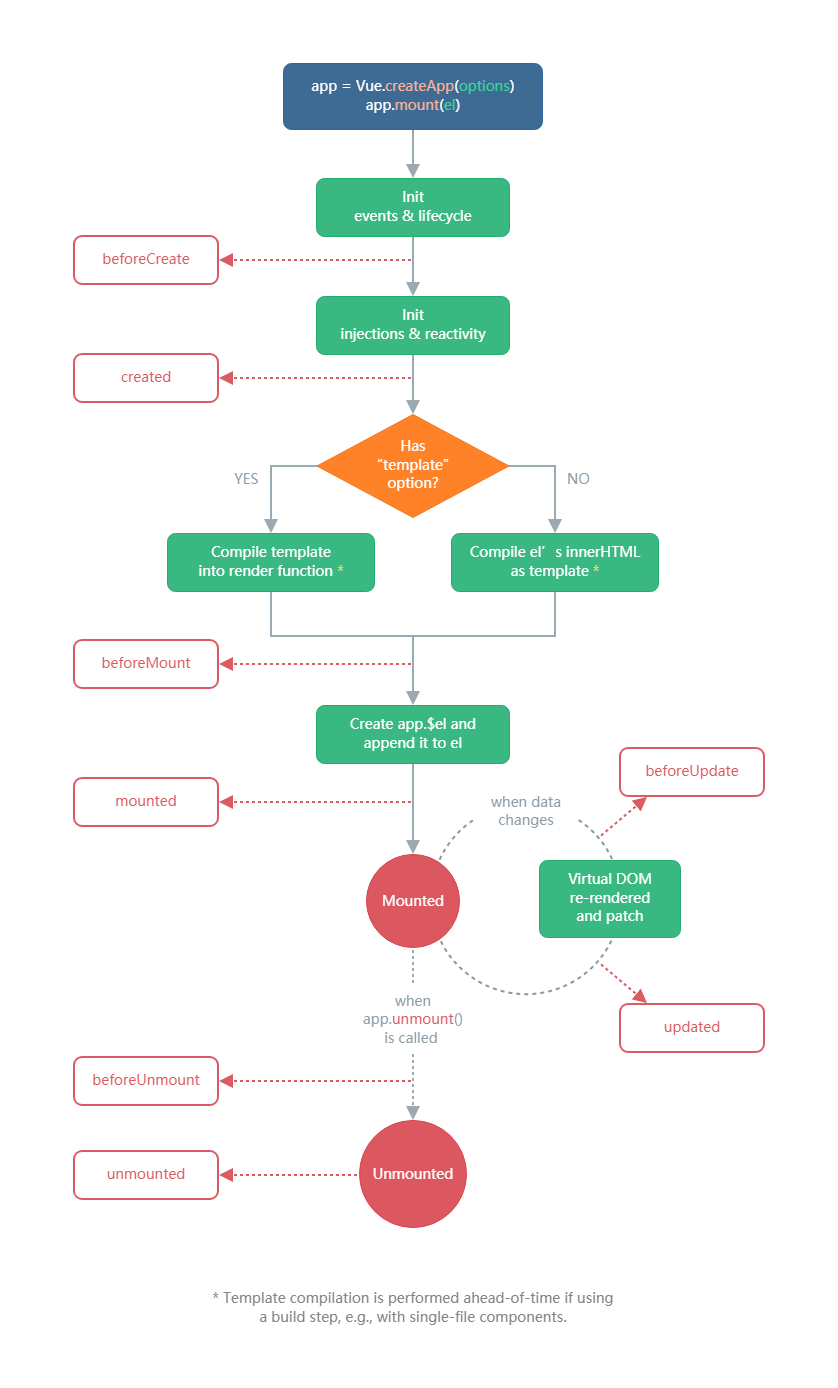
- 实例化一个Vue对象
- 初始化事件和生命周期
- 执行beforeCreate钩子函数(Vue实例还没创建,获取不到Dom节点,拿不到data> 数据和methods方法)
- 初始化响应式、数据代理和数据监测
- 执行created钩子函数(Vue实例已经创建完毕,data数据和methods方法这些已经成功绑定到Vue实例中,但是Dom元素还没有生成,还不能调用)
- 有没有template选项
1)Yes,把template编译成渲染函数
2)No,我们将el挂载的html编译成template
- 执行beforeMount钩子函数(页面还没渲染前,el还挂载在虚拟Dom里)
- 将编译好的html去替换掉el属性里的Dom对象 ,把虚拟Dom变为真实Dom放入页面
- 执行mounted钩子函数(页面已经渲染出来,用来获取数据或者发送网络请求)
- 实时监听数据变化,随时更新Dom,当我们的数据发生变化时
1) 执行beforeUpdate钩子函数(在数据改变之前,虚拟Dom已经更新完了,做一些更新之前需要做的事情)
2)虚拟Dom重新渲染成真实Dom,对比虚拟Dom和真实Dom节点的不同,找需要更新的节点,从而更新
3)执行updated钩子函数(数据改变之后)
4)直到Vue实例对象被销毁
- 执行beforeUnmout钩子函数(Vue实例销毁之前,data数据和methods方法之类还没有被销毁,还能调用,可以解绑事件监听或者清除掉定时器之类事件)
- 执行unmouted钩子函数(Vue实例销毁之后)
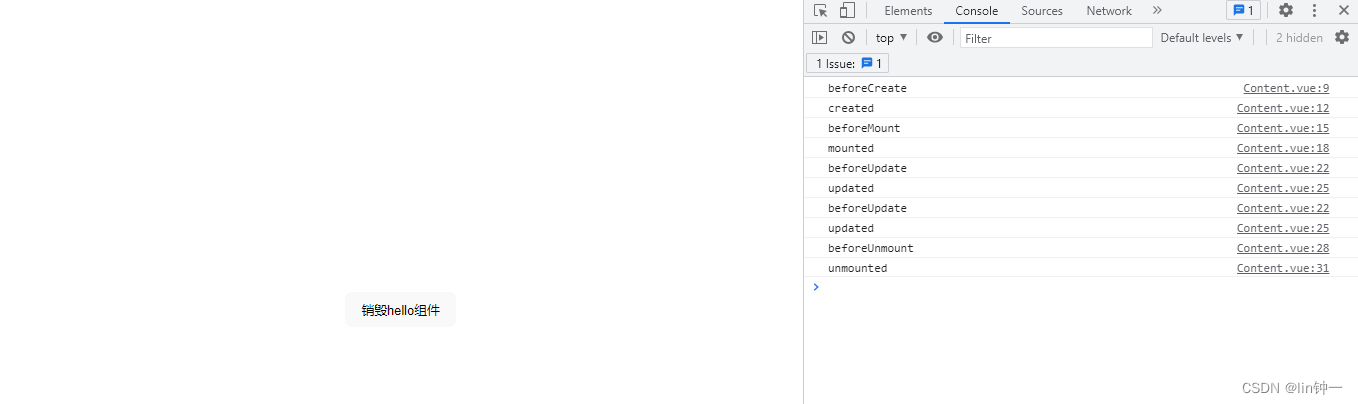
三、生命周期钩子
App.vue
1
2
3
4
5
6
7
8
9
10
11
12
13
14
15
16
17
18
19
20
21
22
| <script>
import content from './components/Content.vue'
export default {
data() {
return {
message: "hello vue",
isShow: true,
}
},
components: {
content
}
};
</script>
<template>
<div>
<content v-if="isShow"></content>
<button @click="isShow = !isShow">销毁hello组件</button>
</div>
</template>
|
content.vue
1
2
3
4
5
6
7
8
9
10
11
12
13
14
15
16
17
18
19
20
21
22
23
24
25
26
27
28
29
30
31
32
33
34
35
36
37
38
39
40
41
42
| <script>
export default {
data() {
return {
counter: 0
}
},
beforeCreate() {
console.log('beforeCreate');
},
created() {
console.log('created');
},
beforeMount() {
console.log('beforeMount');
},
mounted() {
console.log('mounted');
},
beforeUpdate() {
console.log('beforeUpdate');
},
updated() {
console.log('updated');
},
beforeUnmount() {
console.log('beforeUnmount');
},
unmounted() {
console.log('unmounted');
}
}
</script>
<template>
<div>
<h1>hello</h1>
<h1>{{ counter }}</h1>
<button @click="counter++">按钮</button>
</div>
</template>
|